How to remove track changes from a Word document
· Written and maintained by Nonimo
How to remove track changes from a Word document comes down to two buttons and a switch. In Word for Windows, on the Review tab, under Tracking, choose Accept All Changes from the Accept list, or Reject All Changes for unwanted edits, then turn Track Changes off. To remove comments from a Word document, select the arrow beside Delete and choose Delete all Comments in Document. No Markup removes nothing; it only hides the marks.
The reason to do it before the file leaves the office is simple. Whatever you leave in the .docx goes with it: the sentence a colleague deleted, the figure someone typed over, and the comment that says what the client really wants. The solicitor on the other side receives all of that, and so does any AI tool that reads the file when you upload it.
This guide follows Microsoft’s own support pages, read on 4 October 2026, for Word on Windows, Word for Mac and Word for the web, and adds the DPC’s advice on redacting files and the Law Society of Ireland’s guidance on privilege and AI. Covering the client’s details in the body itself is a separate job, done in our guide to redacting a Word document, where the Word tool lives.
How to remove track changes from a Word document in Windows
Word keeps every tracked insertion and deletion inside the file, along with the reviewer who made it, so that someone can decide on each one later. Removing them means making that decision. Microsoft puts it plainly in its page for screen reader users: the only way you can remove tracked changes permanently is to accept or reject them. Everything else only changes how they look.
- Save a copy. File, Save As, with a name that marks it as the version going out. The original keeps its history in case anyone needs it.
- Accept or reject everything. On the Review tab, go to Tracking. In the Accept list, select Accept All Changes; to throw away every proposed edit instead, select Reject All Changes from the Reject list.
- Turn tracking off. On the Review tab, select Tracking, then Track Changes, so the button is no longer highlighted. The keyboard shortcut is Ctrl+Shift+E.
- Check the count. Select Reviewing Pane on the Review tab. The summary at its top shows the exact number of visible tracked changes and comments still in the document.
- Save the copy. Close it and open it again before you send it anywhere.
Steps two and three can be one. In Word for Windows the Accept list also offers Accept All Changes and Stop Tracking, which settles every change and switches tracking off in a single click. Doing this before any other edit matters for redaction too: a name replaced while tracking is still on survives as a tracked deletion, which is why our Word redaction routine settles the changes first.
Accept or reject: which one you want
Microsoft’s training page sums it up in two lines: accept makes a change permanent, and reject gets rid of a change. For a document going out, that matters more than it sounds. Accepting a deletion takes the deleted words out of the file. Rejecting a deletion puts them back into the text. So if a colleague struck out a sentence about the client and you reject everything, the sentence returns.
Most of the time, the version you have been reading with all the marks showing is the one you mean to send, and Accept All Changes is the right button. If some edits were only proposals, go through them one at a time instead: on Windows the Accept list also offers Accept This Change and Accept and Move to Next, and the Reject list has Reject Change and Reject and Move to Next.
When Word will not let you accept them
Two settings can stop you. A document shared with you for review may not let you turn off Track Changes, and Microsoft’s advice is to save a copy or ask the sender to share it again with review mode turned off. Tracking can also be locked with a password, under Review, Tracking, Track Changes, Lock Tracking. While it is locked, anyone can view the changes, but nobody can turn the feature off or accept or reject them.
Without the password, the person who locked the document has to unlock it. In a busy practice that is worth sorting out on the day the draft is agreed rather than five minutes before the email goes.
Why No Markup will not remove track changes from a Word document
This is the mistake that catches most people, because the screen looks finished. Word for Windows offers four views in the Markup group of the Review tab. Simple Markup shows a red line in the margin where something changed. All Markup shows every change, in a different colour for each reviewer. No Markup shows the document with the changes incorporated. Original shows the document as it was, without the changes and comments showing.
None of the four removes anything. Microsoft’s page on accepting and rejecting changes is direct: choosing the No Markup view only temporarily hides changes, and they will be visible again the next time someone opens the document. Its training page says the same of Original, where any change or comment not yet accepted, rejected or deleted remains in the document.
Hiding a type of markup from the Show Markup menu does not last either. Microsoft says the markup automatically displays again each time the document is opened, by you or by a reviewer. And turning Track Changes off does not clear the history: Word stops marking new changes, but the coloured underlines and strikethroughs already in the document stay there.
Printing without the marks
A clean printout is no test either. Word will leave the marks off paper if you go to File, Print, Settings, Print All Pages and clear Print Markup, but Microsoft adds in the same breath that hiding changes doesn’t remove them from the document. A paper copy can look perfect while the file on the shared drive, or attached to the email, still holds every deleted line.
Saving the file in another format does not settle it either. A Rich Text or OpenDocument copy has its own places for comments and for text deleted under tracked changes, as our guide to CSV, RTF and .odt files sets out.
How to remove comments from a Word document
Comments are a separate function. Microsoft says so in as many words at the foot of its tracked changes page: comments are no longer part of the Track Changes function. So clearing a file for the outside world is two jobs, the changes and then the comments, and the second has a button of its own.
- On the Review tab, select the down arrow beside Delete.
- Choose Delete all Comments in Document.
- Open the Comments pane and check that nothing is left in it.
To delete one comment instead, Microsoft’s route is More thread actions, the three dots on the comment, then Delete thread. For a single reply inside a thread, it is More comment actions, then Delete comment. On Windows the keyboard sequence Alt+R, D, O deletes all the comments at once.
Resolved does not mean removed
Marking a thread as resolved feels like tidying up, and it is not. Microsoft says a resolved thread remains in the document until you delete it, and is inactive unless someone reopens it. It disappears from the margin and is dimmed in the Comments pane, which is where it still lives. In the List view of modern comments, resolved and active comments are shown together.
A slide deck keeps its comments in much the same way, each tied to the colleague who wrote it, and clearing them from a presentation follows a route of its own.
Read them before you delete them
Deleting is final. Microsoft’s own phrase is that a deleted comment is gone for good, and its advice is to keep comments until you are finalising the document. In a practice, a comment is often the only record of why a clause changed or what the client said on the phone. Keep the commented original on the file, and clear the comments only in the copy that goes out.
What Accept All and Delete All leave behind
After the two buttons, the copy is cleaner but not yet clean. A Word file can still carry text formatted as hidden, version information, ink annotations, a header with the client’s surname and a set of properties naming the author and the firm. Microsoft’s answer to all of that is Document Inspector, and its page on accepting changes presents it as the final check, after the changes are accepted or rejected.
Accepting or rejecting the changes yourself, before the Inspector, means you decide what the text finally says. The Inspector is then the check that nothing was missed in the parts of the file you do not normally see. The table puts what each button does side by side.
| button or view | what goes | what stays |
|---|---|---|
| No Markup view | nothing | every change and comment |
| Track Changes turned off | nothing already recorded | every change made so far |
| Accept All Changes | the marks; deletions are carried out | comments, a separate function |
| Reject All Changes | the proposed edits | deleted text, back in the body |
| Delete all Comments in Document | every comment, resolved or not | tracked changes |
| Inspector, Comments, Revisions, Versions, and Annotations | comments, revision marks, versions, ink | whatever its other checks would find |
Source: Microsoft Support pages on tracked changes, comments and Document Inspector, read 4 October 2026.
Document Inspector, step by step
Microsoft strongly recommends running the Inspector on a copy, because it is not always possible to restore the data it removes, and Undo may not bring it back. With the copy open:
- On the File tab, select Info.
- Select Check for Issues, and then choose Inspect Document.
- In the Document Inspector dialog box, tick the types of hidden content you want inspected, and select Inspect.
- Review the results, and select Remove All next to each type of content you want gone.
- Select Reinspect to confirm, or Close.
The page lists six checks for Word: Comments, Revisions, Versions, and Annotations; Document Properties and Personal Information; Headers, Footers, and Watermarks; Hidden Text; Custom XML Data; and Invisible Content. It also states two limits. The hidden text check cannot detect text hidden by other methods, such as white text on a white background, and the invisible content check cannot detect objects covered by other objects.
Properties, and the setting that clears them on save
The Document Properties and Personal Information check deals with what the file says about itself: the author, the title, the name of whoever last saved it and the template it was built on. Word for Windows also has a setting called Remove personal information from file properties on Save, under File, Options, Trust Center, Trust Center Settings, Privacy Options. Microsoft says it is turned off in Word, and that the Inspector removes the same information on demand.
The same page notes that the privacy options have moved in newer versions of Office, so the Inspector is the route to rely on. Metadata is a subject of its own, with PDFs and photos in it too, and our guide to removing metadata from PDF and Word files takes it field by field.
How to remove track changes from a Word document on a Mac or in a browser
The two buttons that matter exist on both. Microsoft documents Accept All Changes in the Accept list, and Delete all Comments in Document under the arrow beside Delete, on the Review tab of Word for Mac and of Word for the web, as well as on Windows. What differs is the switch for tracking and the final check.
| turning tracking off | the final check | |
|---|---|---|
| Word for Windows | Review, Tracking, Track Changes | Document Inspector |
| Word for Mac | Review, select Track Changes again | no Inspector; properties by hand |
| Word for the web | Review, Track Changes list, Off | properties only in the desktop app |
Source: Microsoft Support, Track changes in Word and Inspect document, Windows, macOS and web tabs, read 4 October 2026.
On a Mac
In Word for Mac, Track Changes on the Review tab turns tracking on, and selecting it again turns it off. Microsoft’s page on inspecting a document is blunt about the rest: Word for Mac doesn’t have a document inspector. You can view or change properties by hand instead, from the File menu, Properties, where the Summary tab holds the standard fields and the Custom tab anything added to them.
If tracking is locked on a Mac, the route is Review, Protect, Protect Document; untick Protect document for and enter the password. Microsoft’s advice is to remember the password, because while tracked changes are locked you can’t accept or reject them.
In a browser
Word for the web has the same Accept and Reject lists, in the Tracking section of the Review tab, and turns tracking off from the Track Changes list by selecting Off. Its page shows two views, Simple Markup and All Markup. Resolving a comment hides it from active review but does not delete it, and Microsoft’s advice is to use Delete thread to remove one permanently.
Properties cannot be viewed or changed in Word for the web. Microsoft’s route is Editing, then Open in Desktop App, and the last check happens there. If you opened the file in the browser to ask Copilot about it, what Microsoft’s terms say about your data is in our guide to Copilot and your data.
The DPC on hidden content, the Law Society on privilege
The Data Protection Commission’s guidance note on redacting documents and records, last updated in August 2021, was written for subject access requests, but its section on electronic files reads like a description of a Word draft. Files from word processing applications, it says, typically include considerably more information than appears on screen, and document files may contain revision histories, editing markup, comments and other information that is not immediately apparent.
Its first principle for any redaction is to work on a copy. It warns against relying on highlighting or a change of colour, because the words are still there when copied as plain text, and it prefers replacing them with something like [REDACTED]. The same logic applies to a tracked deletion: struck through on screen is not gone from the file.
Subject access requests and other people’s data
Under Article 15 of the GDPR a person can ask for a copy of their personal data, and Article 15(4) adds that the right to a copy shall not adversely affect the rights and freedoms of others. The DPC’s note builds its redaction advice on that qualification. A Word file released in answer to a request, with a colleague’s comment about a third person still inside it, discloses exactly what the redaction was meant to hold back.
People appear in a file in more ways than by name, and our guide to what personal data should be redacted goes through the Irish list, from the PPS number to the Eircode and the IBAN.
Privilege and the other side
For solicitors there is a second reason. The Law Society of Ireland’s guidelines on generative AI, dated December 2025, warn that intentionally providing privileged communications to a free or paid GenAI model without appropriate safeguards may lose the benefit of privilege, because a privileged document has been released to a third party outside the firm. A draft whose comments record the client’s instructions can be exactly that kind of document.
The same file sent to the solicitor on the other side carries the negotiation with it: the figure your client would have accepted before someone typed over it, or the comment that says which clause matters most. Clearing changes and comments in the outgoing copy is part of the ordinary care of sending a draft. Firms putting their AI practice into writing can start from the AI clause in an engagement letter.
Before you upload a Word file to AI, or paste from it
Uploading a .docx to ChatGPT, Copilot, Claude or Gemini hands over the file, and the file is everything this guide has covered: the settled text, plus whatever tracked changes, comments and properties are still inside it. What a given tool reads from the package depends on the tool. The safe position is a file with nothing left in it that you did not mean to send.
Our own test for the Word redaction guide, on 28 September 2026, showed why. A PPS number deleted under tracked changes and replaced with a marker was still stored in the file, and an open source library that read the text returned a hidden sentence as ordinary text while leaving out the marker altogether. What the screen shows and what a program extracts from a .docx are two different things.
The Law Society’s precedent AI use policy puts the principle in one line: only the minimum amount of data necessary should be entered into any AI tool. Tracked changes and comments are rarely part of that minimum. For most tasks the model needs the words of the cleaned copy, not the file.
Does the task need the file itself, with its layout, tables or numbering?
YesClean the copy first: accept or reject, delete the comments, run the Inspector, then upload it.
NoGo to the next question.
Does the text still name the client, or anyone else?
YesCover the names and numbers first, then paste the text.
NoPaste the text of the cleaned copy.
Either way, the original, with its history, stays on the file.
What each provider keeps of what you send is a separate question, and for the tool most offices meet first it is answered in our guide to what ChatGPT keeps.
With the changes and comments gone, cover the client’s details
Accepting every change and deleting every comment leaves the document you meant to send: the body, with the client’s name, PPS number, Eircode and IBAN exactly where they were. That part is what Nonimo covers.
The Word tool in our guide to redacting in Word takes the .docx and gives you back the same Word document, with the details replaced by markers such as [PERSON_1]. The tool has its own privacy notice.
The Nonimo app, for Windows and Mac, does the same on your own computer, and the document does not leave it. It shows you the covered text ready to paste into the AI, and lets you download a covered copy of the same Word file, with its formatting. Once you paste the AI’s reply back into the app, the real details are put back. What the app keeps and sends is listed on our security page.
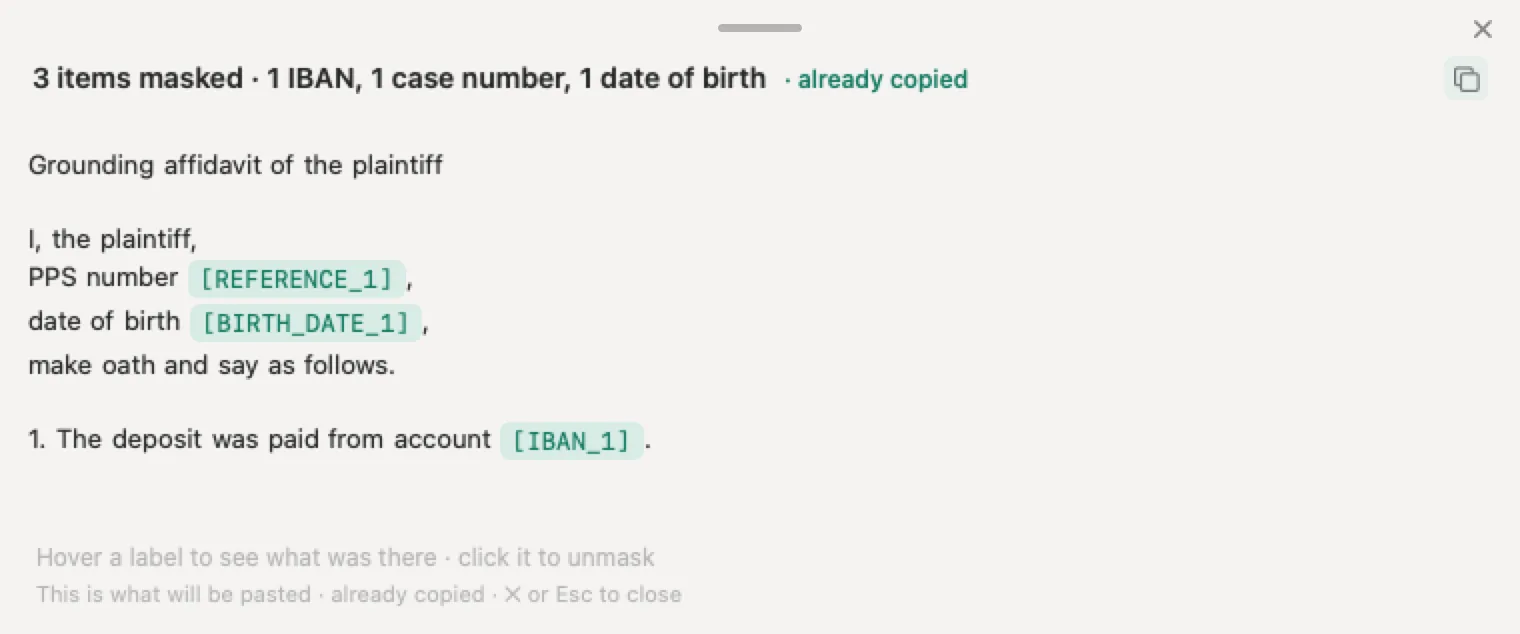
Give the result a quick read before you paste it. You know the file, and you will spot the nickname or the job title that points to the client.
A two-minute check before the file leaves the office
Clearing and checking are different jobs, and checking is the one people skip. On the copy, with the original saved elsewhere, it takes a couple of minutes:
- Open the Reviewing Pane: its summary should show no tracked changes and no comments.
- Make sure Track Changes is off, so the next edit is not recorded.
- On Windows, run Document Inspector and read what it reports before removing anything.
- On a Mac, open File, Properties and read the Summary and Custom tabs.
- Look at the file name, which travels with the file and often carries the client’s surname.
- Keep the original, with its comments and history, on the file.
If the copy is going out as a PDF, export it after these checks, not instead of them. A PDF has hiding places of its own, set out in our guide to redacting a PDF.
Sources
- Microsoft Support, Accept or reject tracked changes in Word. No Markup only temporarily hides changes, which are visible again the next time someone opens the document; Review, Tracking, Accept All Changes and Reject All Changes on Windows, Mac and the web; Document Inspector as the final check. Read 4 October 2026. support.microsoft.com
- Microsoft Support, Track changes in Word. Turning tracking on and off on Windows, Mac and the web; the four markup views; Accept All Changes and Stop Tracking; Lock Tracking; Protect Document on Mac; printing without markup; comments are no longer part of the Track Changes function. Read 4 October 2026. support.microsoft.com
- Microsoft Support, Use a screen reader to track and review changes in a document in Word. The only way to remove tracked changes permanently is to accept or reject them; changes stay marked up after tracking is turned off; Ctrl+Shift+E; locked tracking prevents accepting or rejecting. Read 4 October 2026. support.microsoft.com
- Microsoft Support, Accept tracked changes. Accept makes a change permanent; reject gets rid of a change. Read 4 October 2026. support.microsoft.com
- Microsoft Support, Delete comments. Review tab, the down arrow by Delete, Delete all Comments in Document, for Microsoft 365, Mac and the web; More thread actions, Delete thread. Read 4 October 2026. support.microsoft.com
- Microsoft Support, Give and respond to feedback in shared Word documents. A resolved thread remains in the document until deleted; a deleted comment is gone for good. Read 4 October 2026. support.microsoft.com
- Microsoft Support, Use a screen reader to add, read, and delete comments in Word. Resolving a thread does not delete it; Alt+R, D, O deletes all comments. Read 4 October 2026. support.microsoft.com
- Microsoft Support, Using modern comments in Word. The List view shows active and resolved comments together. Read 4 October 2026. support.microsoft.com
- Microsoft Support, Resolve comments in Word for the web. Resolving hides a comment from active review but does not delete it; Delete thread removes it permanently. Read 4 October 2026. support.microsoft.com
- Microsoft Support, Remove hidden data and personal information by inspecting documents, presentations, or workbooks. File, Info, Check for Issues, Inspect Document; the six Word checks; inspect a copy; the limits on white text and covered objects. Read 4 October 2026. support.microsoft.com
- Microsoft Support, Inspect document. Word for Mac doesn’t have a document inspector; properties by hand on Mac; properties cannot be viewed or changed in Word for the web. Read 4 October 2026. support.microsoft.com
- Microsoft Support, View my privacy options in Microsoft Office. Remove personal information from file properties on Save, turned off in Word; the Inspector on demand; the privacy options have moved in newer versions. Read 4 October 2026. support.microsoft.com
- Data Protection Commission, Redacting Documents and Records (last updated August 2021). Article 15 and 15(4); work on a copy; concealed information including revision histories, editing markup and comments; do not rely on highlighting or recolouring; replace the text. dataprotection.ie
- Law Society of Ireland, Guidelines for the Use of Generative Artificial Intelligence by the Legal Profession in Ireland (December 2025). Providing privileged communications to a GenAI model without appropriate safeguards may lose the benefit of privilege. lawsociety.ie
- Law Society of Ireland, Artificial Intelligence (AI) Use Policy precedent. Data minimisation: only the minimum amount of data necessary should be entered into any AI tool. lawsociety.ie
- Nonimo, our own test of 28 September 2026, for the Word redaction guide. An invented letter built as a .docx: a PPS number deleted under tracked changes stayed in the file, and python-docx returned hidden text while leaving out a tracked insertion. nonimo.ai
Nonimo is the software that does this on your own computer: it masks client names and IDs before your text reaches ChatGPT. No account needed, and the app does it without your files leaving your machine.
Common questions
How do I remove track changes from a Word document for good?
Accept or reject them. Microsoft's support pages, read on 4 October 2026, say the only way to remove tracked changes permanently is to accept or reject them. On the Review tab, open the Accept list under Tracking and choose Accept All Changes, or Reject All Changes for edits you do not want. Then turn Track Changes off, so the next edit is not recorded as well.
Does turning off Track Changes remove the changes already made?
No. Microsoft says that when Track Changes is off, Word stops marking new changes, but the coloured underlines and strikethroughs already in the document stay there until you remove them. A file can carry tracked insertions and deletions even when the button shows tracking is off. Accept or reject everything first, and only then switch tracking off in the copy you are sending.
How do I remove all comments from a Word document at once?
On the Review tab, select the down arrow beside Delete and choose Delete all Comments in Document. Microsoft gives the same route for Word for Microsoft 365 on Windows and on Mac, and for Word for the web. Read them first: Microsoft warns that a deleted comment is gone for good, so keep them in the original and clear them only in the copy that leaves the office.
If I send the file with No Markup showing, will the other side see the changes?
They can. Microsoft's page on accepting and rejecting changes says the No Markup view only hides changes temporarily, and that they show again the next time someone opens the document. The deleted wording and the inserted wording both travel inside the .docx, so the solicitor on the other side, a client or a tool that reads the file receives what you thought you had hidden.
Are resolved comments still in a Word file?
Yes. Microsoft says a resolved thread remains in the document until you delete it, and that resolving a comment hides it from active review without deleting it. Resolved comments still appear in the Comments pane. To take one out of the file, delete the thread, or use Delete all Comments in Document on the Review tab to clear every comment in the copy at once.
Can I use Document Inspector in Word for Mac?
No. Microsoft's own wording is that Word for Mac doesn't have a document inspector, although you can view or change properties by hand under File, then Properties. Accepting all changes and deleting all comments from the Review tab still work on a Mac, so do those two steps and then read the Summary and Custom tabs of the properties yourself before the file goes out.
Why can't I accept or reject the tracked changes in my document?
Tracking is probably locked. Microsoft explains that when tracked changes are locked with a password, anyone opening the document can view the changes but cannot turn the feature off or accept or reject them. On Windows the lock sits under Review, Tracking, Track Changes, Lock Tracking, and you need the password to unlock it, so ask whoever set it before the deadline, not after.
Does accepting all changes take the client's name out of the document?
No. Accepting makes the edits final: deleted text goes and inserted text becomes ordinary text, but every name, PPS number and Eircode in the body stays where it is. Covering those is the next job. The Word tool in our redaction guide gives you back the same Word document with the details replaced by markers, and the Nonimo app does the same on your own computer.